
High Performance AMP Blog with Jekyll - Part 5
In this series I'll show how to setup a high performance, mobile friendly AMP Blog with custom Jekyll plugins while using GitHub pages as a free hosting provider. We create a staging environment and setup an automatic deploy and testing with Travis CI.
Today we have a look how we can modify our website-theme to be customizable and fullfil the requirements to be recognized as a valid AMP Page. We add Structured Data for Googles Rich Results and Open Graph for Facebook shares.
The Basics - what are we talking about today?
The Minima theme
Per default is our website with the Minima theme which includes a lot of useful features and eliminates the need of writing loads of css codes ourself. We want to stick with the defaults and just change what is needed.
The AMP framework
Accelerated Mobile Pages is a Google-backed project designed as an open standard to have pages load quickly on mobile devices. It is a web component and html framework that provides a way to create web pages that are fast, smooth-loading and prioritize the user-experience. Besides the speed benefits are AMP Pages prefered by the google search engine, so AMP websites and blogs have an advantage in the search results above non AMP competetors with a similar rank.
Rich Results
Rich Results are results in google that appear above the standard results which can contain besides normal text also carousels,images, breadcrumb navigation or corporate contact information and logos. They are designed to highlight key information and are composed of Rich Snippets and Rich Cards. By providing Structured Data on your website, you enable Google to better understand your content which can give you a clear competitive advantage above similar results. Googles Rich Result Test lets you test your website and is showing that you’ll need a AMP site to fully leverage it’s benefits.
Lets get started
To make our Jekyll blog to be recognized as AMP, it will need to meet certain criterias:
a) AMP HTML markup, which is a subset of conventional HTML
b) we need to include some starter code
c) we are NOT allowed to use external CSS, but we can use inline CSS
d) we are NOT allowed to use custom JavaScript, but we can use AMP components
e) we need to use amp-img instead of classic <img> tags
f) we need to use amp-video instead of including them with an iframe
To achieve all this we need to change our theme and Jekyll generation, but it is not as hard as it may seems on first glance.
Owning the theme for customisations
We need to override the HTML structures provided by the Minima theme. For that we will need to create two new folders in our repository. We create a _layouts folder, for holding the layout files we want to override and an _includes folder for the re-usable snippets/ components we are going to use throughout our blog.
development/websites/my-new-website
▶ mkdir _layouts && mkdir _includes
To be able to override existing files, we will need to import them first into our own project. One easy way to get started is to clone the Minima theme and then move all the files we need over into our website.
development/websites/my-new-website
▶ cd ..

development/websites
▶ git clone https://github.com/jekyll/minima.git
First we copy the assets and _sass folders to gain control over the stylesheets
development/websites
▶  cp -a minima/assets my-new-website/assets

development/websites
▶  cp -a minima/_sass my-new-website/_sass
Next we copy over the default layout from _layouts/default.html
development/websites
▶  cp minima/_layouts/default.html my-new-website/_layouts/default.html
And last but not least _includes/head.html
development/websites
▶  cp  minima/_includes/head.html my-new-website/_includes/head.html
When we now build our blog, we see that one file named 'custom-head.html is missing, which is referenced in _layouts/default.html
development/websites/my-new-website
▶ bundler exec jekyll build
Configuration file: development/websites/my-new-website/_config.yml
            Source: development/websites/my-new-website
       Destination: development/websites/my-new-website/docs
 Incremental build: disabled. Enable with --incremental
      Generating...
       Jekyll Feed: Generating feed for posts
  Liquid Exception: Could not locate the included file 'custom-head.html' in any of ["development/websites/my-new-website/_includes", "/Library/Ruby/Gems/2.6.0/gems/minima-2.5.1/_includes"]. Ensure it exists in one of those directories and, if it is a symlink, does not point outside your site source. in development/websites/my-new-website/_layouts/default.html
To fix this error we open _includes/head.html (which is included in _layouts/default.html) and remove it, since we don’t need it for our purpose.
# _includes/head.html
<head>
  <meta charset="utf-8">
  <meta http-equiv="X-UA-Compatible" content="IE=edge">
  <meta name="viewport" content="width=device-width, initial-scale=1">
  {%- seo -%}
  <link rel="stylesheet" href="{{ "/assets/css/style.css" | relative_url }}">
  {%- feed_meta -%}
  {%- if jekyll.environment == 'production' and site.google_analytics -%}
    {%- include google-analytics.html -%}
  {%- endif -%}
</head>
Serving the page right now should be error free and our blog should look exactly as before.
development/websites/my-new-website
▶ bundler exec jekyll serve --baseurl ""
Configuration file: development/websites/my-new-website/_config.yml
            Source: development/websites/my-new-website
       Destination: development/websites/my-new-website/docs
 Incremental build: disabled. Enable with --incremental
      Generating...
       Jekyll Feed: Generating feed for posts
Jekyll Picture Tag Warning: flag.png is smaller than the requested fallback width of 800px. Using 775 px instead.
Jekyll Picture Tag Warning: flag.png
is 775px wide (after cropping, if applicable),
smaller than at least one size in the set [400, 600, 800, 1000].
Will not enlarge.
                    done in 0.291 seconds.
 Auto-regeneration: enabled for 'development/websites/my-new-website'
    Server address: http://127.0.0.1:4000/
  Server running... press ctrl-c to stop.
Adding the AMP HTML markup
The next thing we have to do is to declare that we are going to serve an AMP page. For doing this we go to _layouts/default.html and replace
<!DOCTYPE html>
<html lang="{{ page.lang | default: site.lang | default: "en" }}">
with
<!doctype html>
<html amp lang="{{ page.lang | default: site.lang | default: "en" }}>
Now we open _includes/head.html and add this content
<head>
  <meta charset="utf-8">
  <meta name="viewport" content="width=device-width, initial-scale=1">
  <script async src="https://cdn.ampproject.org/v0.js"></script>
  {%- seo -%}
  <style amp-custom>
      {% capture styles %}
        {% include style.scss %}
      {% endcapture %}
      {{ styles | scssify }}
    </style>
    <style amp-boilerplate>body{-webkit-animation:-amp-start 8s steps(1,end) 0s 1 normal both;-moz-animation:-amp-start 8s steps(1,end) 0s 1 normal both;-ms-animation:-amp-start 8s steps(1,end) 0s 1 normal both;animation:-amp-start 8s steps(1,end) 0s 1 normal both}@-webkit-keyframes -amp-start{from{visibility:hidden}to{visibility:visible}}@-moz-keyframes -amp-start{from{visibility:hidden}to{visibility:visible}}@-ms-keyframes -amp-start{from{visibility:hidden}to{visibility:visible}}@-o-keyframes -amp-start{from{visibility:hidden}to{visibility:visible}}@keyframes -amp-start{from{visibility:hidden}to{visibility:visible}}</style><noscript><style amp-boilerplate>body{-webkit-animation:none;-moz-animation:none;-ms-animation:none;animation:none}</style></noscript>
  {%- feed_meta -%}
  {%- if jekyll.environment == 'production' and site.google_analytics -%}
    {%- include google-analytics.html -%}
  {%- endif -%}

</head>
We are adding here the required AMP JavaScript library and AMP Boilerplate. For more details please have a look at the AMP Basic markup guide.
To render our CSS style inline in the header as required, we also include our style.scss file within <style amp-custom> instead of using a <link> as usual.
Including the styles inline in the header
To be able to include our style, we have to move them to _includes/styles.scss and remove the frontmatter dashes in styles.css
@import
  "minima/skins/classic",
  "minima/initialize";
We don’t need the assets/css/style.scss anymore, so you can delete it.
Serving Jekyll should not trigger an breaking error, the site should look exactly the same as before, but the Page Source should reveal our changes.
development/websites/my-new-website
▶ bundler exec jekyll serve --baseurl ""
Configuration file: development/websites/my-new-website/_config.yml
            Source: development/websites/my-new-website
       Destination: development/websites/my-new-website/docs
 Incremental build: disabled. Enable with --incremental
      Generating...
       Jekyll Feed: Generating feed for posts
Jekyll Picture Tag Warning: flag.png is smaller than the requested fallback width of 800px. Using 775 px instead.
Jekyll Picture Tag Warning: flag.png
is 775px wide (after cropping, if applicable),
smaller than at least one size in the set [400, 600, 800, 1000].
Will not enlarge.
                    done in 0.314 seconds.
 Auto-regeneration: enabled for 'development/websites/my-new-website'
    Server address: http://127.0.0.1:4000/
  Server running... press ctrl-c to stop.
That looks good and the Page Source should be similar to
<!DOCTYPE html>
<html amp lang="en"><head>
<meta charset="utf-8">
<meta name="viewport" content="width=device-width, initial-scale=1">
<script async src="https://cdn.ampproject.org/v0.js"></script><!-- Begin Jekyll SEO tag v2.6.1 -->
<title>Your awesome title | Write an awesome description for your new site here. You can edit this line in _config.yml. It will appear in your document head meta (for Google search results) and in your feed.xml site description.</title>
<meta name="generator" content="Jekyll v4.1.1" />
<meta property="og:title" content="Your awesome title" />
<meta property="og:locale" content="en_US" />
<meta name="description" content="Write an awesome description for your new site here. You can edit this line in _config.yml. It will appear in your document head meta (for Google search results) and in your feed.xml site description." />
<meta property="og:description" content="Write an awesome description for your new site here. You can edit this line in _config.yml. It will appear in your document head meta (for Google search results) and in your feed.xml site description." />
<link rel="canonical" href="http://localhost:4000/" />
<meta property="og:url" content="http://localhost:4000/" />
<meta property="og:site_name" content="Your awesome title" />
<script type="application/ld+json">
{"headline":"Your awesome title","url":"http://localhost:4000/","name":"Your awesome title","description":"Write an awesome description for your new site here. You can edit this line in _config.yml. It will appear in your document head meta (for Google search results) and in your feed.xml site description.","@type":"WebSite","@context":"https://schema.org"}</script>
<!-- End Jekyll SEO tag -->
<style amp-custom>

      .highlight .c { color: #998; font-style: italic; }

.highlight .err { color: #a61717; background-color: #e3d2d2; }
...
</style>
<style amp-boilerplate>body{-webkit-animation:-amp-start 8s steps(1,end) 0s 1 normal both;-moz-animation:-amp-start 8s steps(1,end) 0s 1 normal both;-ms-animation:-amp-start 8s steps(1,end) 0s 1 normal both;animation:-amp-start 8s steps(1,end) 0s 1 normal both}@-webkit-keyframes -amp-start{from{visibility:hidden}to{visibility:visible}}@-moz-keyframes -amp-start{from{visibility:hidden}to{visibility:visible}}@-ms-keyframes -amp-start{from{visibility:hidden}to{visibility:visible}}@-o-keyframes -amp-start{from{visibility:hidden}to{visibility:visible}}@keyframes -amp-start{from{visibility:hidden}to{visibility:visible}}</style><noscript><style amp-boilerplate>body{-webkit-animation:none;-moz-animation:none;-ms-animation:none;animation:none}</style></noscript><link type="application/atom+xml" rel="alternate" href="http://localhost:4000/feed.xml" title="Your awesome title" /></head>
...
Validating our Results
So did we actually made a valid AMP page? Let’s check with an AMP Validator and paste our Page Source in.
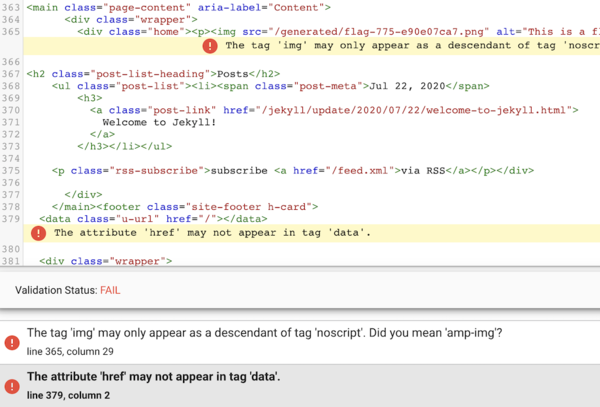
Oh no, we have two issues to fix. One the one hand is our image not wrapped into a <amp-img> yet and on the other hand do we have an invalid attribute in the footer.
Fixing the issues
For now we are going to remove the image from index.markdown since we have an in-depth look into amp-images in the follow up article.
The invalid url attribute for the microdata is actually an known bug with Minima, so we are going to remove this as well. To do that we copy _includes/footer.html from the Minima Theme into our includes folder to make it customizable
development/websites/my-new-website
▶ cp ../minima/_includes/footer.html _includes/footer.html
and then simply delete the line <data class="u-url" href="{{ "/" | relative_url }}"></data>
Validating again with AMP Validator now shows that we are passing the test.
Rich Results
One of our main reason of switching to an AMP project is that we want to be eligible for Googles Rich Results. If we are heading to the Rich Result Test and paste our Page Source in, we see that our blog is error free, but is NOT eligible for Rich Result. The problem is that we don’t submit enough Structured Data to qualify. The preinstalled SEO Plugin provides some, but not enough.
Structured Data, Social Shares and Opengraph
Besides Google do other social media platforms as Facebook and Twitter require special markup to share posts feature rich, most notably with the Open Graph protocol. We are going to solve this issues by providing a custom solution which fits our needs a little better then the out-of-the-box solution.
Create the Social Media Header Data
We are going to include the file seo_tags into our projects includes folder. It renders all the needed <meta /> properties for Open Graph and Twitter and is based on the original jekyll_seo_tag template, just better in regards of Structured data.
The key component for this is this section:
<script type="application/ld+json">
    {
      "@context": "http://schema.org",
      "@type": "BlogPosting",
      "mainEntityOfPage": {
        "@type": "WebPage",
        "@id": "{{page_url}}"
      },
      "headline": "{{page_title}}",
      "image": "{{page_image}}",
      "datePublished": "{{publish_date}}",
      "dateModified": "{{modified_date}}",
      "author": {
        "@type": "Person",
        "name": "{{page_author}}"
      },
      "editor": "{{page_author}}",
      "publisher": {
        "@type": "Organization",
        "name":"{{ site.title}}",
        "logo": {
          "@type": "ImageObject",
          "url": "{{site.logo}}"
        }
      },
      "description": "{{description}}",
      "keywords": ["{{keywords | join: '","'}}"],
      "genre": ["{{keywords | join: '","'}}"]
        }

    }
</script>
The Data
To work properly you want to extend your _config.yml to have the following new properties
author: Your Name
keywords: [Blogging, Jekyll, GitHub Pages, free hosting, open source]
logo: https://rasta.online/library/images/rasta-logo.png
These values are used to give additional information about your website and Posts and are the fallback for the same properties used on a Page or Post. For each Post you now can specify in Front Matter a specific author, a list of keywords and a preview images that shows when people share your content.
---
layout: post
title: Blogging Like a Hacker
author: John Doe
keywords: [Unique Topic, Special, delicious food]
image: http://path/to/social/share/preview.png
---
If you are mostly publishing alone, you may don’t want to repeat yourself alot, so if you don’t specify this on a Post, the site defaults are used instead. You also can define Front Matter Defaults in your _config.yml to get even more control over the used values
defaults:
  -
    scope:
      path: ""
      type: "posts"
    values:
      author: Your Name
      image: https://social/share/default.png
Replace the default SEO header
In _includes/head.html you now have to replace {%- seo -%} with:
{% capture seo %}{% include seo_tags.html %}{%endcapture%}
  {{ seo | split: " " | join: " "}}
You also could use a simpler {% include seo_tags.html %} but this way you’ll loose a lot of unneeded whitespaces, so you decreases the size of the generated HTML.
Deploy the changes
development/websites/my-new-website
▶ git add . && git commit -m"convert page to AMP, add Social share meta data and Structured data for Rich results" && git push
...
development/websites/my-new-website
▶ git tag -a 1.1.0 -m"converting to AMP" && git push origin --tags
Validating the results
After the Build and deploy is done we want to check what we got so far so we check our website again with Rich Result Test.

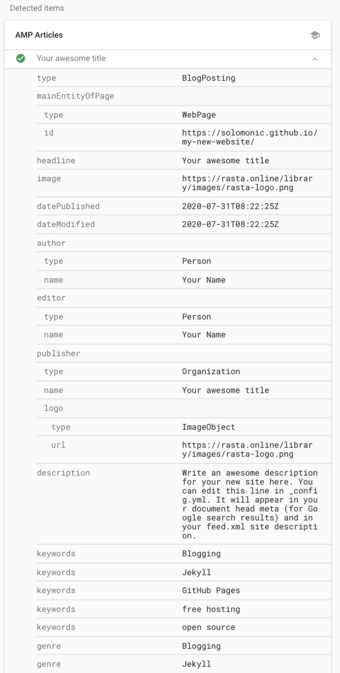
Great, that worked well!
But is our website fast? After all are we using an free hosting provider. Let’s check with Googles Pagespeed Insights
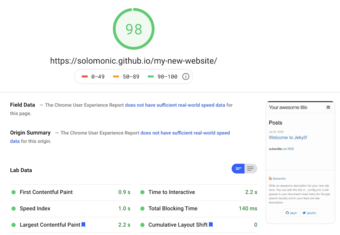
Yes, we are!
Conclusion
We’ve done it! We finally got the setup for a high performance AMP Blog with Rich Results for free. We get automated testing and deployment with Travis CI and can use any helpful Jekyll plugin.
In the next articles we have a look at how to configure our AMP images, how to use AMP components to get a feature rich site and finally how to connect a CMS connected to get a better user experience when creating content.